Jazmyn Vandervort
New member
- Joined
- Apr 13, 2024
- Messages
- 20
- Points
- 1
Do you know how to set up an Amazon account? Amazon is one of the world's largest online shopping websites with everything from necessities to luxury goods. Therefore, there are many shoppers who specialize in ordering American products and have set up shopping accounts on this e-commerce site. If you still don't have an Amazon account, you can refer to how to set up an Amazon account in this article by smsverificationphone. Let's find out now!

Amazon Account
Step 1: Get started.
You access “Amazon.com”. In the upper right corner, you will see a menu called “Your Account”. When you move the mouse pointer, another menu will appear. Finally, click the “Start Here” link below the yellow “Sign In” button.
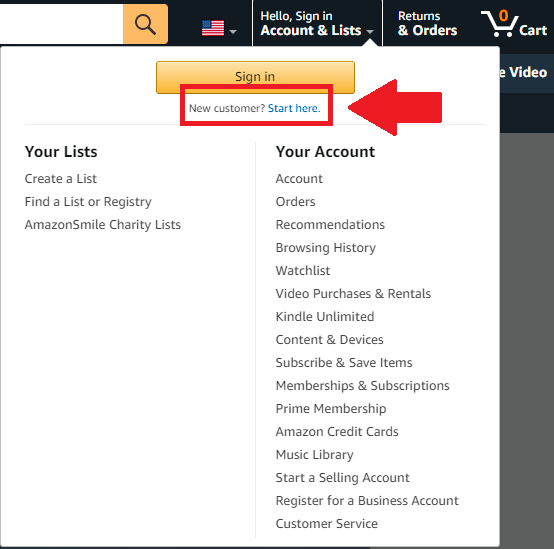
New customer
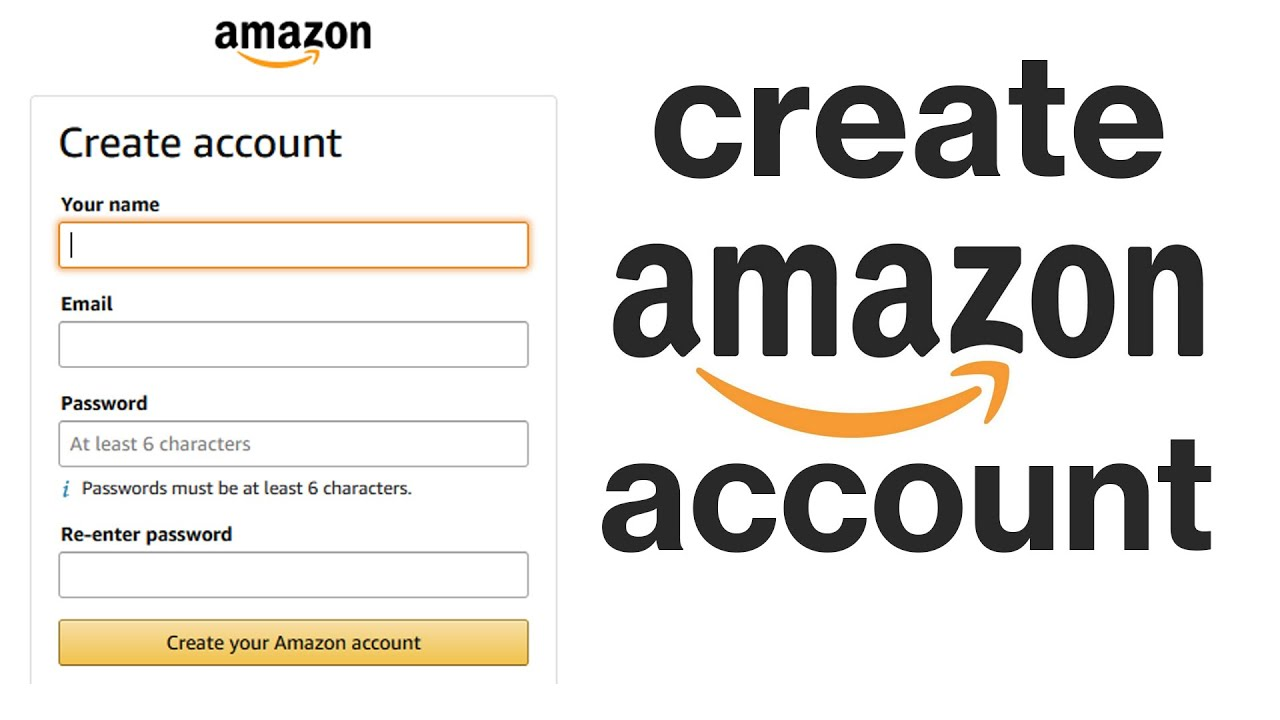
Step 2: Enter information
Your name and email address will be required in the registration form. Then, you choose to set a password. You can also enter a phone number in the registration information. Although not required, this will help improve your skills
Step 3: Complete the registration process
After completing all necessary information, press “Create Account”. So you have successfully created an official account.
Step 1: Edit payment method
After creating your account, you'll have to set up a payment method. Click “Your Account” on the top right. Under the “Payment Methods” menu, select “Add a Credit Card”. Enter information related to the type of card you plan to use, including your billing address.
After completing this step, you can confirm the information entered is correct by going to “Manage Your Payment Methods”. If installation is successful, your credit card will appear here.
Step 2: Add delivery address
Click “Your Account” again and select “Account Settings”. Find the “Add New Address” option. Enter your password, then fill in your name and delivery address. Select “Save and Continue”. So you're ready to shop on Amazon!
Step 3: Manage address books
This is an optional feature but provides a better shopping experience. Find “Your Account” and click “Manage Address Book”. Amazon will ask you to enter additional addresses for yourself and the people you're buying gifts for. When marking an address as “Gifting Address”, Amazon will automatically attach a receipt with the gift order when sent to that address.
Step 4: Personalize profile
Go to “Your Account” again and click “Your Public Profile”, under the “Personalization” subheading. Amazon will prompt you to enter any details that you allow to appear on your public profile. When finished, click the “I have read the Terms and Conditions” box, then click continue. You will be asked to complete additional information about yourself. After clicking “Finish”, your profile is complete.
If you value privacy, limit the public information on your profile. You should also be careful not to enter more than 4000 characters when asked to provide additional details.
Install steps at amazon account
Step 5: Link to social networks
Go to “Your Account” and click “Your Social Settings” under the “Personalization” subheading. You will be taken to a window that connects your Amazon account to your Facebook account. You can also select “Twitter Settings” and connect to Twitter. Connecting to Facebook and Twitter allows sharing of products you have purchased and liked.
 Amazon Seller Account
Step 1: Enter sales account registration information
Step 2: 1st identity verification – Seller Identity Verification (SIV)
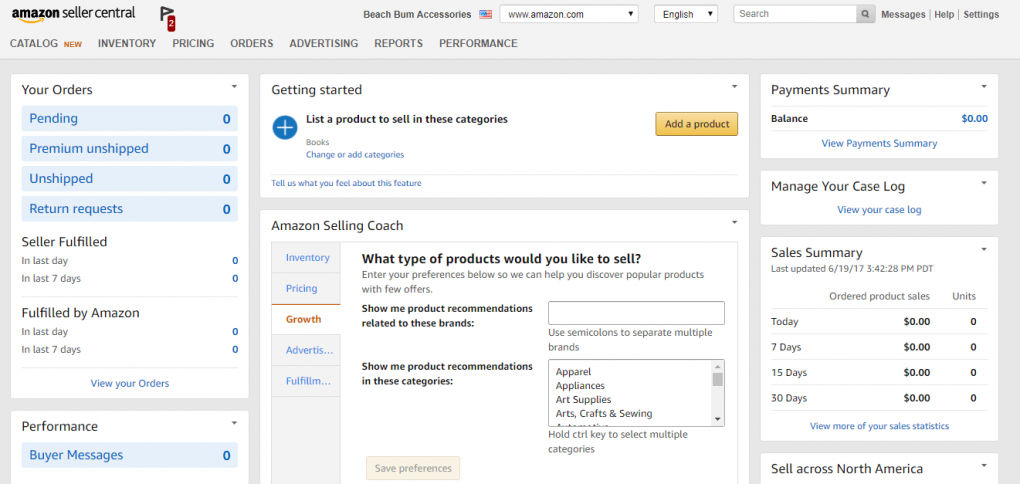
Step 3: Log in to your Seller Central account
Step 4: Second identity verification - Seller Performance Review (SPR)
Important note:
If you have completed step 1 of identity verification and are having problems in the second round of identity verification, please send your application back to the Seller Performance Review Team.
Note: Do not create another account while still in this step, because doing so will be considered a violation of Amazon's policy prohibiting one person from having multiple sales accounts.
Step 1: Start registration
Visit https://sellercentral.amazon.com/ to register for a selling account.
Click Register now >> Start Selling >> Create your Amazon account. All information is entered without accents.
The OTP code will be sent to your registered email. Please check your inbox and enter this code in the Enter OTP section at Seller Central. Then click "Create your Amazon account" to create an account.
Step 2: Fill in Business Information
To complete step 1, you need to complete the following fields:
Business Location: Select the location where your business is located. If there is no , you will enter your country of residence.
Business Type: Select business type.
State-owned business: State-owned enterprise.
Publicly-listed business: Publicly listed business.
Privately-owned business: Private enterprise.
Charity: Charitable organization.
None, I am an individual: No, I am an individual.
If choosing the type of business or charity organization, please fill in the business name in English as it appears on the Business Registration Certificate or Bank Account Statement. Business Name cannot be changed after filling in, so be sure to fill it in correctly.
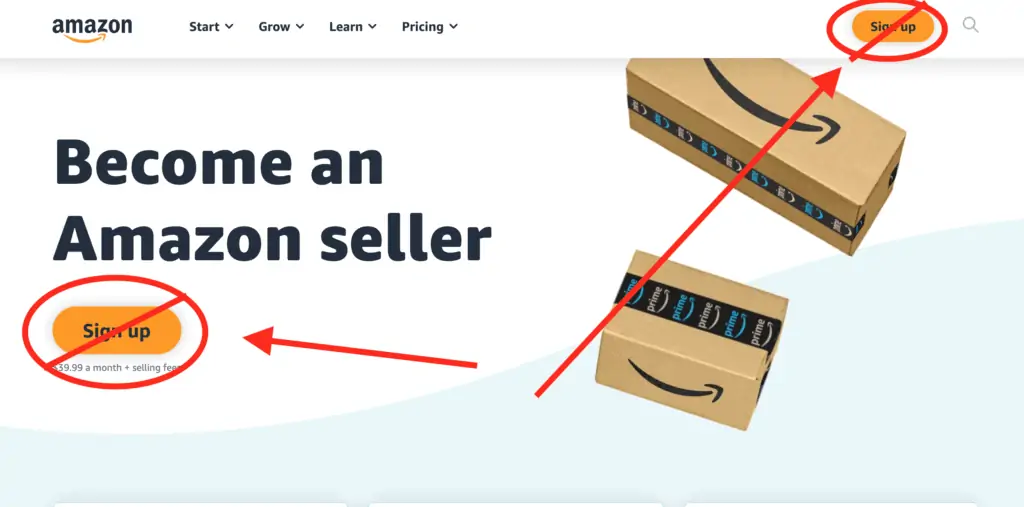
Become an Amazon Seller
If you choose the individual type, please fill in the account holder's full name in the boxes:
First name: Middle name + first name
Last name: Last name
Leave middle name(s) blank
After filling in the information, click on the 3 policies, agreements and notices at the bottom of the page to view the sales agreement. Then select “Agree and continue” to continue.
Step 3: Fill in Seller Information
In this step, Amazon asks you to provide the following information:
- Business Address: Fill in address information
If you are a business: Fill in the address information as on the Business Registration Certificate.
If you are an individual: You fill in the address information as shown in your account/credit card statement, electricity/water/Internet bill.
- Receive a PIN code to verify your phone number.
- Then select the country code
- Select the English language, then press “Send SMS”.
- After receiving the message, enter the 6-digit PIN and press "Verify". Once completed click ‘Next’
In the Personal Information section, fill in the personal information of the business's legal representative. Residential Address Enter the legal representative's home address. If you have entered the business address in step 1, the system will automatically display the business address in this section. You can add the business owner's personal address by selecting "Add another address".
Step 4: Fill in Payment Information
In the Financial Institution Name list, select a financial institution that is an Amazon payment service partner.
Sellers can refer to the frequently asked questions listed on the side panel to learn more about Amazon's payment service partners.
Country: Select United States and fill in cardholder information. This Credit Card will be used to pay the monthly maintenance fee. Please note that you do not fill in the Debit/Prepaid card, otherwise Amazon will lock your account to update the credit card.
Step 5: Enter stall information
In this section, specifically you will have to completely and accurately enter the following information:
- Store name: Enter the display name of the store. You can change the store name after creating an account.
- Answer the questions according to the form as shown:
Does your product have a UPC (product code)?
Are you the manufacturer/brand owner of the product?
Do you own a registered trademark for the branded products you want to sell on Amazon?
Step 6: Verify identity for the first time
Initial identity verification documents require:
- Identification documents include 1 of the following 3 types of documents:
Passport.
Identity card/citizen identification card.
Driver's license (if the license does not have an expiration date, use a passport instead).
Additional documents include one of the following two types of documents:
- Bank account statement.
- Credit card statement.
Step 1: Identity Document
Passport: If you select Passport, upload a single passport file. Ensure:
The passport must have the passport holder's signature below Bearer's Signature and must not be expired.
Full name, passport number, date of birth, and expiration date must match the registration information. Scan the original in color or take a photo of the information page and signature page with your phone. You can use your finger to hold down the passport page when taking a photo to prove that this is a real passport, but be careful not to let your hand cover the information and limit taking photos on a black and white background. Identity card/Citizen identification card/Driver's license.
Setup and start selling
Step 2: For this type of paperwork, Amazon requires more complexity. Please carefully perform the following steps:
Upload 2 separate files: front and back of ID card/license. Ensure:
- ID card/license must be valid. Name, ID card/license number, date of birth, expiration date must match the registration information.
- If you only have a Vietnamese ID card/license, you will need:
If your ID card is old and does not have an expiration date, the validity period is 15 years from the date of issue.
For personal accounts, the name on the statement needs to match the Amazon account registration name. For corporate accounts, the name on the statement must match the name of the legal entity registering the Amazon account.
The address on the statement must match the Amazon account registration address.
Statement must be issued within the last 90 days, have bank name, address and logo.
If the statement is not bilingual in English and Vietnamese, it must be translated and notarized into English. Combine all pages of the original and the translation and notarization into 1 file.

A great seller
Smsverificationphone hopefully the above useful information will help you have luck in creating a successful account on Amazon.
Amazon Account
1. The simplest way to set up a shopping account on Amazon
There are 2 types of Amazon accounts, 1 for sellers and 1 for buyers. The first part of the article will describe how to set up an Amazon account for people who want to buy goods from Amazon to Vietnam.1.1 Create an account
To successfully create a personal account, follow these 3 steps:Step 1: Get started.
You access “Amazon.com”. In the upper right corner, you will see a menu called “Your Account”. When you move the mouse pointer, another menu will appear. Finally, click the “Start Here” link below the yellow “Sign In” button.
New customer
Step 2: Enter information
Your name and email address will be required in the registration form. Then, you choose to set a password. You can also enter a phone number in the registration information. Although not required, this will help improve your skills
Step 3: Complete the registration process
After completing all necessary information, press “Create Account”. So you have successfully created an official account.
1.2 Optimize personal account
After registering, the next thing you need to do is install the necessary items for the future purchase process.Step 1: Edit payment method
After creating your account, you'll have to set up a payment method. Click “Your Account” on the top right. Under the “Payment Methods” menu, select “Add a Credit Card”. Enter information related to the type of card you plan to use, including your billing address.
After completing this step, you can confirm the information entered is correct by going to “Manage Your Payment Methods”. If installation is successful, your credit card will appear here.
Step 2: Add delivery address
Click “Your Account” again and select “Account Settings”. Find the “Add New Address” option. Enter your password, then fill in your name and delivery address. Select “Save and Continue”. So you're ready to shop on Amazon!
Step 3: Manage address books
This is an optional feature but provides a better shopping experience. Find “Your Account” and click “Manage Address Book”. Amazon will ask you to enter additional addresses for yourself and the people you're buying gifts for. When marking an address as “Gifting Address”, Amazon will automatically attach a receipt with the gift order when sent to that address.
Step 4: Personalize profile
Go to “Your Account” again and click “Your Public Profile”, under the “Personalization” subheading. Amazon will prompt you to enter any details that you allow to appear on your public profile. When finished, click the “I have read the Terms and Conditions” box, then click continue. You will be asked to complete additional information about yourself. After clicking “Finish”, your profile is complete.
If you value privacy, limit the public information on your profile. You should also be careful not to enter more than 4000 characters when asked to provide additional details.
Install steps at amazon account
Step 5: Link to social networks
Go to “Your Account” and click “Your Social Settings” under the “Personalization” subheading. You will be taken to a window that connects your Amazon account to your Facebook account. You can also select “Twitter Settings” and connect to Twitter. Connecting to Facebook and Twitter allows sharing of products you have purchased and liked.
2. Instructions for setting up an Amazon account for sellers
Next are instructions for setting up an Amazon account for business units that want to sell on this marketplace.
2.1 Four-step process of opening a selling account on Amazon
To have an Amazon selling account, you need to complete the following process:Step 1: Enter sales account registration information
Step 2: 1st identity verification – Seller Identity Verification (SIV)
Step 3: Log in to your Seller Central account
Step 4: Second identity verification - Seller Performance Review (SPR)
Important note:
If you have completed step 1 of identity verification and are having problems in the second round of identity verification, please send your application back to the Seller Performance Review Team.
Note: Do not create another account while still in this step, because doing so will be considered a violation of Amazon's policy prohibiting one person from having multiple sales accounts.
2.2 Enter sales account registration information
After completing the steps to open an account on Amazon, the next step you need to do is enter the sales account registration information. The steps are as follows:Step 1: Start registration
Visit https://sellercentral.amazon.com/ to register for a selling account.
Click Register now >> Start Selling >> Create your Amazon account. All information is entered without accents.
The OTP code will be sent to your registered email. Please check your inbox and enter this code in the Enter OTP section at Seller Central. Then click "Create your Amazon account" to create an account.
Step 2: Fill in Business Information
To complete step 1, you need to complete the following fields:
Business Location: Select the location where your business is located. If there is no , you will enter your country of residence.
Business Type: Select business type.
State-owned business: State-owned enterprise.
Publicly-listed business: Publicly listed business.
Privately-owned business: Private enterprise.
Charity: Charitable organization.
None, I am an individual: No, I am an individual.
If choosing the type of business or charity organization, please fill in the business name in English as it appears on the Business Registration Certificate or Bank Account Statement. Business Name cannot be changed after filling in, so be sure to fill it in correctly.
Become an Amazon Seller
If you choose the individual type, please fill in the account holder's full name in the boxes:
First name: Middle name + first name
Last name: Last name
Leave middle name(s) blank
After filling in the information, click on the 3 policies, agreements and notices at the bottom of the page to view the sales agreement. Then select “Agree and continue” to continue.
Step 3: Fill in Seller Information
In this step, Amazon asks you to provide the following information:
- Business Address: Fill in address information
If you are a business: Fill in the address information as on the Business Registration Certificate.
If you are an individual: You fill in the address information as shown in your account/credit card statement, electricity/water/Internet bill.
- Receive a PIN code to verify your phone number.
- Then select the country code
- Select the English language, then press “Send SMS”.
- After receiving the message, enter the 6-digit PIN and press "Verify". Once completed click ‘Next’
In the Personal Information section, fill in the personal information of the business's legal representative. Residential Address Enter the legal representative's home address. If you have entered the business address in step 1, the system will automatically display the business address in this section. You can add the business owner's personal address by selecting "Add another address".
Step 4: Fill in Payment Information
In the Financial Institution Name list, select a financial institution that is an Amazon payment service partner.
Sellers can refer to the frequently asked questions listed on the side panel to learn more about Amazon's payment service partners.
Country: Select United States and fill in cardholder information. This Credit Card will be used to pay the monthly maintenance fee. Please note that you do not fill in the Debit/Prepaid card, otherwise Amazon will lock your account to update the credit card.
Step 5: Enter stall information
In this section, specifically you will have to completely and accurately enter the following information:
- Store name: Enter the display name of the store. You can change the store name after creating an account.
- Answer the questions according to the form as shown:
Does your product have a UPC (product code)?
Are you the manufacturer/brand owner of the product?
Do you own a registered trademark for the branded products you want to sell on Amazon?
Step 6: Verify identity for the first time
Initial identity verification documents require:
- Identification documents include 1 of the following 3 types of documents:
Passport.
Identity card/citizen identification card.
Driver's license (if the license does not have an expiration date, use a passport instead).
Additional documents include one of the following two types of documents:
- Bank account statement.
- Credit card statement.
2.3 Documents to establish records
During the profile creation process, Amazon will ask you to submit some documents for authentication. Here's what you need to prepare.Step 1: Identity Document
Passport: If you select Passport, upload a single passport file. Ensure:
The passport must have the passport holder's signature below Bearer's Signature and must not be expired.
Full name, passport number, date of birth, and expiration date must match the registration information. Scan the original in color or take a photo of the information page and signature page with your phone. You can use your finger to hold down the passport page when taking a photo to prove that this is a real passport, but be careful not to let your hand cover the information and limit taking photos on a black and white background. Identity card/Citizen identification card/Driver's license.
Setup and start selling
Step 2: For this type of paperwork, Amazon requires more complexity. Please carefully perform the following steps:
Upload 2 separate files: front and back of ID card/license. Ensure:
- ID card/license must be valid. Name, ID card/license number, date of birth, expiration date must match the registration information.
- If you only have a Vietnamese ID card/license, you will need:
- Translated and notarized into English.
- Scan in color or capture the original into a separate file.
- Color scan or photo of all pages of the translation and notarization into a separate file.
- Upload front side: Upload the original including the front and back of the ID card/GPLX.
- Upload back side: Upload the translation and notarization of ID card/GPLX including all pages of the profile.
If your ID card is old and does not have an expiration date, the validity period is 15 years from the date of issue.
2.4 Additional documents (Additional documents)
In the Additional document section, if you select a bank account statement, you submit the bank account statement. If you choose a credit card statement, you submit a credit card statement. Ensure:For personal accounts, the name on the statement needs to match the Amazon account registration name. For corporate accounts, the name on the statement must match the name of the legal entity registering the Amazon account.
The address on the statement must match the Amazon account registration address.
Statement must be issued within the last 90 days, have bank name, address and logo.
If the statement is not bilingual in English and Vietnamese, it must be translated and notarized into English. Combine all pages of the original and the translation and notarization into 1 file.
A great seller
Smsverificationphone hopefully the above useful information will help you have luck in creating a successful account on Amazon.